Key Points
- After this session, you’ll understand blockchain basics, but creating your own blockchain like “LazyChain” likely requires knowledge from other sessions, such as node setup and wallet creation.
- You’ll learn key concepts like blocks, chains, hashes, and consensus mechanisms (Proof of Work vs. Proof of Stake), using a simple JavaScript/Node.js example.
- For Python coding, this session focuses on understanding, not implementation; JavaScript is used here, but Python can simulate similar concepts with libraries like hashlib for hashes.
Understanding Blockchain Basics
This session lays the foundation for grasping how blockchains work, focusing on blocks, chains, hashes, and consensus mechanisms. It’s a starting point, not the full journey to creating your own blockchain. You’ll build a simple blockchain in JavaScript/Node.js to get hands-on with concepts. While this won’t make you a blockchain creator yet, it’s a crucial step, and you’ll need later sessions for nodes and wallets to complete the picture.
Why Other Sessions Matter
Creating “LazyChain” or your own coin involves more than basics. You’ll need to learn about setting up nodes (computers maintaining the blockchain) and crafting wallets (for storing coins) in future sessions. This session is like learning the alphabet before writing a novel—it’s essential, but not the whole story.
Python Coding for Blockchain
This session uses JavaScript for coding, but if you prefer Python, you can simulate blockchain concepts. You’ll need to know:
- Hashing: Use hashlib for SHA-256, like hashlib.sha256(data.encode()).hexdigest() for block hashes.
- Classes: Define Block and Blockchain classes, similar to JavaScript, for structure.
- Lists/Dictionaries: Store blocks in a list, with each block as a dictionary (e.g., {data: “Lazy Guy was here”, hash: “abc123”}).
Here’s a basic Python example to get you started:
python
import hashlib
import time

class Block:
    def __init__(self, data, previous_hash):
        self.data = data
        self.timestamp = time.time()
        self.previous_hash = previous_hash
        self.hash = self.calculate_hash()

    def calculate_hash(self):
        # Simple hash of data, timestamp, and previous hash
        value = str(self.data) + str(self.timestamp) + str(self.previous_hash)
        return hashlib.sha256(value.encode()).hexdigest()

class Blockchain:
    def __init__(self):
        self.chain = [self.create_genesis_block()]

    def create_genesis_block(self):
        return Block("Genesis Block", "0")

    def add_block(self, data):
        previous_block = self.chain[-1]
        new_block = Block(data, previous_block.hash)
        self.chain.append(new_block)

    def is_chain_valid(self):
        for i in range(1, len(self.chain)):
            current_block = self.chain[i]
            previous_block = self.chain[i-1]
            if current_block.hash != current_block.calculate_hash():
                return False
            if current_block.previous_hash != previous_block.hash:
                return False
        return True

# Usage
my_blockchain = Blockchain()
my_blockchain.add_block("Lazy Guy was here")
print("Blockchain valid?", my_blockchain.is_chain_valid())
for block in my_blockchain.chain:
print(f"Data: {block.data}, Hash: {block.hash}")This Python code mirrors the JavaScript example, helping you see how blocks link via hashes and validate integrity. It’s a starting point, not a full blockchain, but it’s a practical way to learn.

Explanation
- Genesis Block:
- Prev Hash: All zeros (no prior block).
- Hash: Computed from header (e.g., 000000000019d6689c085ae1—Bitcoin-like).
- Transactions: Includes a “coinbase” transaction (creates new coins, e.g., 50 LazyCoins to Alice), plus one more.
- Merkle Root: Hashes of a1b2c3d4 and d4c3b2a1 combined.
- Block 1:
- Prev Hash: Matches Genesis’s hash (000000000019d6689c085ae1).
- Hash: New hash (0000000000000000000abcde), mined with nonce.
- Transactions: Three transfers, each input referencing prior outputs (e.g., a1b2c3d4’s output spent to Bob).
- Merkle Root: Summarizes e5f6g7h8, i9j0k1l2, m3n4o5p6.
- Chain: Block 1’s Prev Hash locks to Genesis’s Hash, like a linked list’s prev pointer.
Real example as demo:
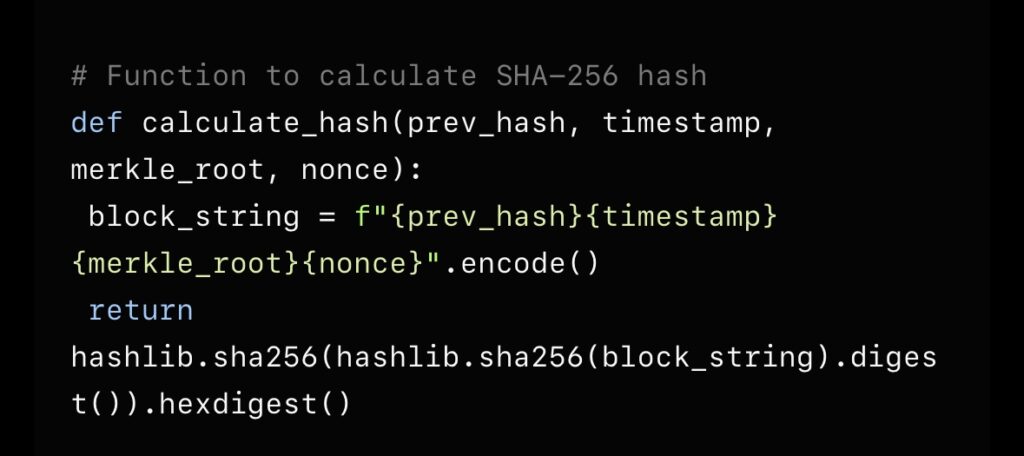
1.function to calculate new Hash
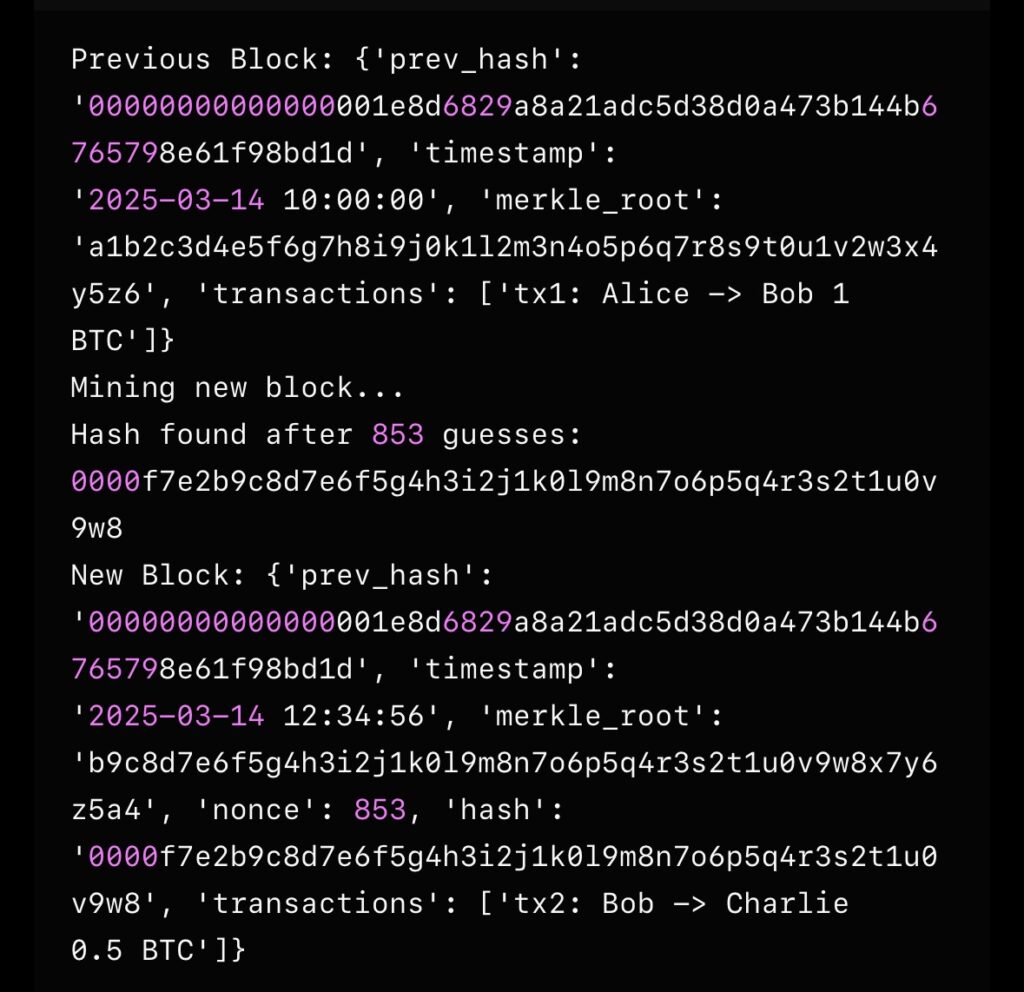
2.Connect new block
How it work?
- Previous Block: We start with a simulated previous block containing a hash, timestamp, Merkle root, and transactions.
- New Block Data: We define new transaction data, a current timestamp, and a fake Merkle root (in reality, this would be calculated from transactions).
- Hash Calculation: The calculate_hash function combines the previous hash, timestamp, Merkle root, and a nonce, then applies double SHA-256 (Bitcoin’s standard).
- Mining: We guess the nonce (0 to 9999) until the hash starts with “0000” (a simple difficulty target for demo purposes—real Bitcoin needs more zeros).
- New Block: Once a valid hash is found, we create a new block linked to the previous one via its hash.
Simplifications:
- Difficulty: Real Bitcoin difficulty is much higher (e.g., 20+ zeros), requiring trillions of guesses. Here, “0000” keeps it fast.
- Merkle Root: Normally calculated from transaction hashes, but hardcoded here for brevity.
- Nonce Range: Limited to 10,000 guesses to avoid long runtime.
Survey Note: Detailed Training Material for Understanding Blockchain Basics
This section provides a comprehensive guide for your session on “Understanding Blockchain Basics,” aiming to equip you with the foundational knowledge to grasp how blockchains work and prepare for creating your own, like “LazyChain.” Given your goal to potentially build a blockchain or integrate with MetaMask, this session is crucial, but it’s only the first step. Let’s break it down systematically, covering key concepts, coding examples, and why this matters for your broader journey.
Introduction to Blockchain
A blockchain is a decentralized, distributed ledger that records transactions across multiple computers (nodes) in a tamper-proof way. It’s like a digital ledger where each page (block) is linked to the previous one via cryptographic hashes, ensuring immutability. This structure underpins cryptocurrencies like Bitcoin and Ethereum, and understanding it is your gateway to dreaming up “LazyChain.”
Key Concepts Explained
To build this foundation, let’s dive into the core ideas:
- Blocks: Each block is a container for data, like transactions in Bitcoin or messages in our example. It has a header (metadata) and a body (the data). For instance, a block might hold “Lazy Guy was here” as data, with a timestamp and hash.
- Chains: Blocks are linked sequentially, forming a chain. Each block’s header includes the hash of the previous block, creating a chain from the first block (genesis block) to the latest. This linkage ensures if one block changes, all subsequent blocks are invalid.
- Hashes: A hash is a unique, fixed-length string generated from data using a cryptographic function like SHA-256. For example, hashing “Lazy Guy was here” might output “abc123xyz.” Even a tiny change (e.g., “Lazy Guy was there”) produces a completely different hash, making tampering detectable. In blockchain, each block’s hash depends on its data and the previous block’s hash, ensuring integrity.
- Decentralization: Unlike a central database (e.g., a bank’s server), blockchains are managed by a network of nodes, each holding a copy. This distribution makes it harder to hack, as an attacker would need to control most nodes. It’s like having multiple copies of a ledger, all agreeing on the same version.
- Consensus Mechanisms: These are rules for nodes to agree on the blockchain’s state. Two main types are:
- Proof of Work (PoW): Used by Bitcoin, where nodes (miners) solve complex math puzzles to add blocks, consuming significant energy. The first to solve gets to add the block and earn rewards.
- Proof of Stake (PoS): Used by Ethereum (post-merge), where the chance to add a block depends on how much cryptocurrency a node holds (its stake). It’s greener but has issues like “nothing at stake,” where nodes might not act honestly if they have little to lose.
For “LazyChain,” PoS might be a lazy, efficient choice, but we’ll explore that later. For now, understand these mechanisms ensure agreement without a central authority.
Coding a Simple Blockchain
Your plan is to build a blockchain in JavaScript/Node.js, inspired by Smashing Magazine’s guide. While the tutorial uses JavaScript, I’ll also show Python, as you asked, to align with your preference. Let’s break down the coding process, starting with Python for clarity, given its readability.
Python Implementation
Here’s a detailed example using Python, leveraging hashlib for SHA-256 hashes, to simulate a blockchain. This mirrors the JavaScript approach but might feel more familiar:
python
import hashlib
import time

class Block:
    def __init__(self, data, previous_hash):
        """
        Initialize a block with data, timestamp, and hashes.
        Args:
            data: The content of the block (e.g., "Lazy Guy was here")
            previous_hash: Hash of the previous block to link the chain
        """
        self.data = data
        self.timestamp = time.time()
        self.previous_hash = previous_hash
        self.hash = self.calculate_hash()

    def calculate_hash(self):
        """
        Calculate the SHA-256 hash of the block's data, timestamp, and previous hash.
        Returns:
            str: Hexadecimal hash string
        """
        value = str(self.data) + str(self.timestamp) + str(self.previous_hash)
        return hashlib.sha256(value.encode()).hexdigest()

class Blockchain:
    def __init__(self):
        """
        Initialize the blockchain with a genesis block (first block, no previous hash).
        """
        self.chain = [self.create_genesis_block()]

    def create_genesis_block(self):
        """
        Create the first block with dummy data and "0" as previous hash.
        Returns:
            Block: The genesis block
        """
        return Block("Genesis Block", "0")

    def add_block(self, data):
        """
        Add a new block to the chain, linking it to the previous block.
        Args:
            data: The data for the new block (e.g., "Lazy Guy was here")
        """
        previous_block = self.chain[-1]
        new_block = Block(data, previous_block.hash)
        self.chain.append(new_block)

    def is_chain_valid(self):
        """
        Validate the entire chain for integrity.
        Checks if each block's hash matches its calculated hash and previous hash links correctly.
        Returns:
            bool: True if valid, False if tampered
        """
        for i in range(1, len(self.chain)):
            current_block = self.chain[i]
            previous_block = self.chain[i-1]
            if current_block.hash != current_block.calculate_hash():
                return False
            if current_block.previous_hash != previous_block.hash:
                return False
        return True

# Usage Example
my_blockchain = Blockchain()
my_blockchain.add_block("Lazy Guy was here")
print("Blockchain valid?", my_blockchain.is_chain_valid())
for block in my_blockchain.chain:
print(f"Data: {block.data}, Timestamp: {block.timestamp}, Hash: {block.hash}, Previous Hash: {block.previous_hash}")This code:
- Defines a Block class with data, timestamp, and hashes, linked via previous_hash.
- Creates a Blockchain class with a genesis block and methods to add blocks and validate the chain.
- Demonstrates immutability: if you change a block’s data, is_chain_valid() returns False, showing tampering.
For JavaScript, follow Smashing Magazine’s guide, which uses similar logic but with Node.js’s crypto module for SHA-256. The structure is identical: Block and Blockchain classes, with methods for hashing and validation.
What You’ll Learn from Coding
- How blocks link via hashes: Each block’s hash depends on its data and the previous block’s hash, ensuring changes are detectable.
- Immutability: The is_chain_valid() method shows why blockchains are tamper-proof.
- Basic structure: You’ll see how a chain grows, starting from the genesis block.
This coding exercise is educational, not production-ready. Real blockchains (like Bitcoin) handle multiple transactions per block, use consensus mechanisms, and scale across nodes, which we’ll cover later.
Can You Create Your Own Blockchain After This?
Research suggests that after this session, you’ll understand blockchain basics, but creating a full “LazyChain” requires more. You’ll need:
- Node Setup: Running nodes (computers maintaining the chain) for decentralization, covered in a future session.
- Wallet Creation: Building wallets for storing and transacting your coin, also a later topic.
- Consensus Mechanisms: Implementing Proof of Stake or Work for network agreement, beyond this session’s scope.
Think of this as learning to draw a single block before sketching the whole chain. It’s a solid start, but you’ll need the full toolkit from other sessions to build and deploy “LazyChain.”
Python Skills Needed
For this session, you don’t need advanced Python, but knowing:
- Classes and Objects: To define Block and Blockchain, as shown.
- Hashing: Using hashlib.sha256() for cryptographic hashes.
- Lists and Dictionaries: To store and manipulate blocks.
The code above is beginner-friendly, and you can run it in any Python environment (e.g., VS Code, Jupyter Notebook). If you’re new, start with online Python tutorials like Real Python’s basics.
Why It Matters
Understanding blockchain basics is like learning the rules of chess before playing. It’s essential for dreaming up “LazyChain,” whether you create a coin, integrate with MetaMask, or build a decentralized exchange. This session sets the stage, but the journey continues with nodes, wallets, and more.
Table: Key Concepts and Examples
| Concept | Description | Example in Code |
|---|---|---|
| Blocks | Units holding data, linked via hashes | Block(“Lazy Guy was here”, “hash”) |
| Chains | Sequence of blocks, starting from genesis | Blockchain().chain list |
| Hashes | Cryptographic fingerprint, ensures integrity | hashlib.sha256(data.encode()).hexdigest() |
| Decentralization | Managed by multiple nodes, no central control | Future session on nodes |
| Consensus Mechanisms | Rules for agreeing on blockchain state | PoW (Bitcoin) vs. PoS (Ethereum) |
This table summarizes what you’ll learn, with code ties for clarity.
Citations